One of the big problems we face on our websites is the use of forms by “bots” in order to spread “spams” and that ends up causing a super use of our server resources, such as CPU and memory.
Basically, this procedure is the result of algorithms that identify the forms of our sites (contact for example) and start submitting information in them too much and automatically. With this, the production of “spam” ends up becoming a problem for our email services or even for our application’s database
One way to protect our website (our forms) from these robots is to implement a “captcha” type verification, in which a field is added that can verify if the user is really a human being.
Well then. In this post I will show you how to use Google’s “reCAPTCHA” (https://google.com/recaptcha/admin) within your site, and thus avoid the accumulation of “spam”.
The first step is to authenticate with your Google account and access the address: https://google.com/recaptcha/admin
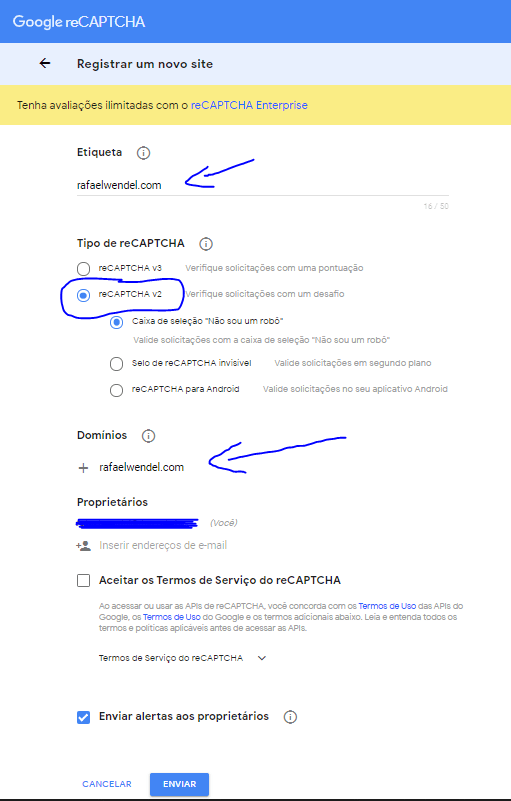
On this page we are going to add a new website. In the field “Label” you define the name you want, to remember better if you have several “recaptchas” for several different sites. I put the domain itself.
In “Type of reCAPTCHA” you have several options. In my case, I selected the option “reCAPTCHA v2” and then the sub-option “Checkbox ‘I’m not a robot‘”.
In “Owners” will appear your email and if you want you can add other addresses of who can monitor and manage this reCAPTCHA.
Once that is done, “accept the reCAPTCHA terms of service” and then click on “Send“.
On the next page, 2 keys will be generated.
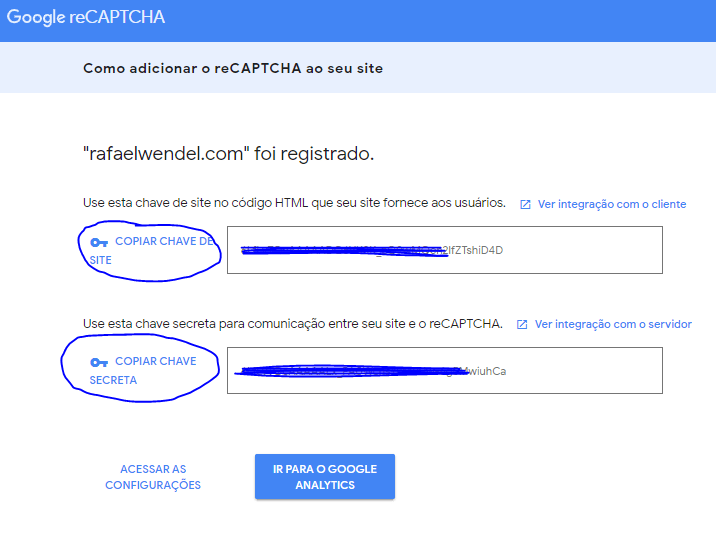
It is important that you copy these 2 keys that were generated (the site key and the secret key). We will use the first one to create the field “I am not a robot” in our form and the second one we will use to validate the verification whenever our form is submitted.
On our website now, the first thing we have to do is add the “javascript” file that will help us insert and validate the captcha. Before closing the “head” tag of the page that contains the form, put the following code:
<script src='https://www.google.com/recaptcha/api.js'></script> |
Now let’s go to the form we want to insert the reCAPTCHA.
1 2 3 4 5 6 7 8 9 10 11 12 13 14 | <html> <head> <title>reCAPTCHA</title> <script src='https://www.google.com/recaptcha/api.js'></script> </head> <body> <form method="post" action="verify.php"> <label>Nome:</label><input type="text" name="nome" /><br /> <label>Email:</label><input type="email" name="email" /><br /> <div class="g-recaptcha" data-sitekey="PASTE-YOUR-SITE_KEY-HERE"></div> <button type="submit">Enviar</button> </form> </body> </html> |
See that in line 10 I put the div “g-recaptcha” and in the attribute “data-sitekey” we should insert precisely the site key that we copied from Google’s reCAPTCHA panel. (NOTE: The “action” of this form submits the information to the verify.php file and therefore it will be in this file that I will verify if the reCAPTCHA was interacted correctly).
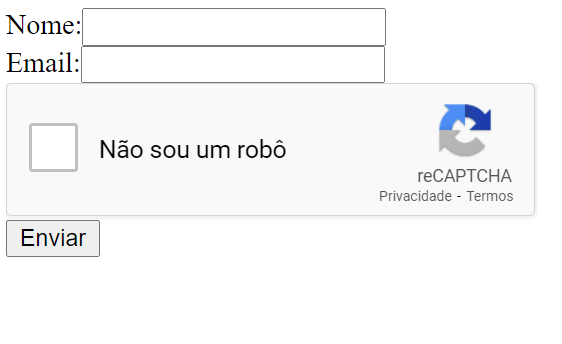
Running the page, we can see that reCAPTCHA is displayed:
Now, in the verify.php file, let’s check if everything went correctly with reCAPTCHA. To do this we will retrieve the information “g-recaptcha-response“, which was submitted via POST along with the other form data.
1 2 3 4 5 6 7 8 9 10 11 12 13 14 15 16 17 | <?php $captcha = isset($_POST['g-recaptcha-response']) ? $_POST['g-recaptcha-response'] : null; if(!is_null($captcha)){ $res = json_decode(file_get_contents("https://www.google.com/recaptcha/api/siteverify?secret=PASTE-YOUR-SECRET_KEY-HERE&response=".$captcha."&remoteip=".$_SERVER['REMOTE_ADDR'])); if($res->success === true){ //CAPTCHA validado!!! echo 'Tudo certo =)'; } else{ echo 'Erro ao validar o captcha!!!'; } } else{ echo 'Captcha não preenchido!'; } |
In line 6 we make a request to check if the captcha is valid. See that we must pass our secret key in the URL for the process to work. This request will return a json with the success information. If it is true, it means that the captcha has been validated.
And ready! That way your form will be more protected!
On the Google dashboard you can view a report containing the requests/checks, suspicious requests and so on.

I hope this content is useful to you.
See you!
Rafael Wendel Pinheiro
Holds a university degree in Information Systems, a postgraduate degree in Database Systems and a master's degree in Education with a focus on Sociocommunity Technologies. He works as a professor of technical and technological education at the Federal Institute of Education, Science and Technology of São Paulo, teaching subjects in the areas of programming, database, project development and software engineering.
Hi, I can’t. Can I find someone to do this for me? I pay if I have to. Thank you
I do!