In this post I will cover the use of the Smarty Template Engine (version 4.0.0) (https://www.smarty.net/) in an introductory way.
Smarty is a engine to manage templates in projects developed in PHP language. Its objective is to enable the separation of the application logic part (php language) and the presentation part (html / css). Thus, we will have a application logic (with the implementation of business rules, data access, distributed form / cookies) and another presentation layer (to present the application layout).
Before starting, let’s imagine the following php array:
$athletes = ['Michael Jordan', 'Serena Williams', 'Tiger Woods']; |
Using just the php language, to display athletes in a list we would have code similar to the following:
<ul> <?php foreach ($athletes as $athlete) : ?> <li><?php echo $athlete ?></li> <?php endforeach; ?> </ul> |
This same array being displayed in a list through Smarty would look like this:
<ul> {foreach $athletes as $athlete} <li>{$athlete}</li> {/foreach} </ul> |
See that we have cleaner, more readable and elegant code =)
How to install Smarty 4.0.0?
To install Smarty 4, we can download the compressed files by github (https://github.com/smarty-php/smarty/releases/tag/v4.0.0) or install via Composer using the following command:
composer require smarty/smarty |
NOTE 1: In this tutorial, we used as a base an installation via Composer.
NOTE 2: Smarty 4.0.0 requires php version 7.1 or higher.
Project Directory Structure
When we install using Composer, the “vendor” folder is created (the Smarty library files are inside it).
In addition to the “vendor”, we will also create the following directories:
- templates
- templates_c
- cache
- config
First Example
The idea of this tutorial is to explain very simply and for beginners how Smarty works. So, let’s put some basic php code. As said before, Smarty allows us to separate the logic layer of our application from the presentation layer. Therefore, we will have the logic in the “index.php” file and the presentation in the “templates/index.tpl” file.
So let’s create in the root of our project, the file “index.php”. First, let’s create an instance of the “Smarty()” class in this file. Let’s define the template, compiled templates, cache and config directories. Finally, let’s run the “testInstall” method to check if everything is ok.
1 2 3 4 5 6 7 8 9 10 11 12 | <?php require 'vendor/autoload.php'; $smarty = new Smarty(); $smarty->setTemplateDir('templates/'); $smarty->setCompileDir('templates_c/'); $smarty->setCacheDir('cache/'); $smarty->setConfigDir('config/'); $smarty->testInstall(); |
When we run, we hope to have the following result:
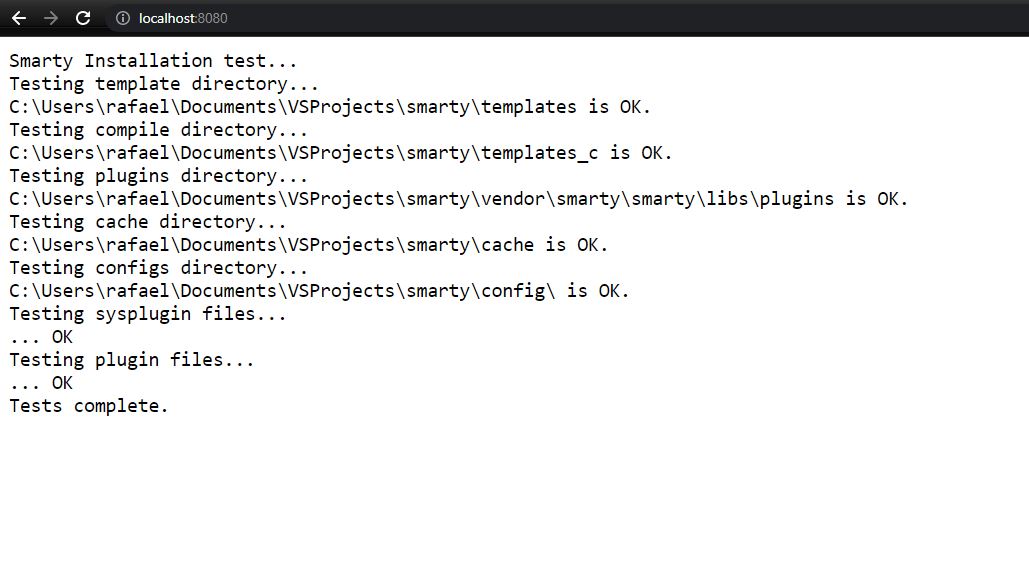
Right. Since everything is working, we can delete line 12.
Now let’s see how we can pass variables and values from our logic layer to our presentation layer. We will pass 2 variables (“title” and “message”) to Smarty’s “assign” method. Finally, let’s call the template “index.tpl” (which will be created inside the “templates” folder).
1 2 3 4 5 6 7 8 9 10 11 12 13 14 15 | <?php require 'vendor/autoload.php'; $smarty = new Smarty(); $smarty->setTemplateDir('templates/'); $smarty->setCompileDir('templates_c/'); $smarty->setCacheDir('cache/'); $smarty->setConfigDir('config/'); $smarty->assign('title', 'PHP + Smarty'); $smarty->assign('message', 'Learning a bit about Smarty'); $smarty->display('index.tpl'); |
It is important to understand that within the “index.tpl” file we will have access to the variables “title” and “message”.
Creating the “index.tpl” file inside the “templates” folder, let’s put the following code.
1 2 3 4 5 6 7 8 9 10 11 | <!DOCTYPE html> <html lang="en"> <head> <meta charset="UTF-8"> <title>{$title}</title> </head> <body> <h1>{$title}</h1> <h2>{$message}</h2> </body> </html> |
To access the variables, just surround them with braces: {$varName}
Rerun or refresh your browser and see the result.
Second example: working with arrays
The assign method allows us to assign any type of variable (common variable, arrays, objects, etc.) to later be used within the template file.
In our “index.php” file, now let’s pass an array with a list of athletes
1 2 3 4 5 6 7 8 9 10 11 12 13 14 15 16 17 18 19 20 21 22 23 | <?php require 'vendor/autoload.php'; $smarty = new Smarty(); $smarty->setTemplateDir('templates/'); $smarty->setCompileDir('templates_c/'); $smarty->setCacheDir('cache/'); $smarty->setConfigDir('config/'); $smarty->assign('title', 'PHP + Smarty'); $smarty->assign('message', 'Learning a bit about Smarty'); $athletes = [ 'Michael Jordan', 'Serena Williams', 'Tiger Woods']; $smarty->assign('athletes', $athletes); $smarty->display('index.tpl'); |
To traverse this array inside “index.tpl” we use {foreach} {/foreach}
1 2 3 4 5 6 7 8 9 10 11 12 13 14 15 16 17 | <!DOCTYPE html> <html lang="en"> <head> <meta charset="UTF-8"> <title>{$title}</title> </head> <body> <h1>{$title}</h1> <h2>{$message}</h2> <h3>Athletes list</h3> <ul> {foreach $athletes as $athlete} <li>{$athlete}</li> {/foreach} </ul> </body> </html> |
Now let’s suppose a multidimensional array, where we have in each position the keys “name” and “sport”.
1 2 3 4 5 6 7 8 9 10 11 12 13 14 15 16 17 18 19 20 21 22 23 24 25 26 27 28 29 30 31 32 | <?php require 'vendor/autoload.php'; $smarty = new Smarty(); $smarty->setTemplateDir('templates/'); $smarty->setCompileDir('templates_c/'); $smarty->setCacheDir('cache/'); $smarty->setConfigDir('config/'); $smarty->assign('title', 'PHP + Smarty'); $smarty->assign('message', 'Learning a bit about Smarty'); $athletes = [ '0' => [ 'name' => 'Michael Jordan', 'sport' => 'Basquete' ], '1' => [ 'name' => 'Serena Williams', 'sport' => 'Tênis' ], '2' => [ 'name' => 'Tiger Woods', 'sport' => 'Golfe' ],]; $smarty->assign('athletes', $athletes); $smarty->display('index.tpl'); |
To access an array position by its key, we use the dot “.”
1 2 3 4 5 6 7 8 9 10 11 12 13 14 15 16 17 | <!DOCTYPE html> <html lang="en"> <head> <meta charset="UTF-8"> <title>{$title}</title> </head> <body> <h1>{$title}</h1> <h2>{$message}</h2> <h3>Athletes list</h3> <ul> {foreach $athletes as $athlete} <li>{$athlete.name} - {$athlete.sport}</li> {/foreach} </ul> </body> </html> |
Third example: working with objects
To pass an object from php to the template file, just pass this object to the “assign” method, as we have already done for common variables and arrays.
1 2 3 4 5 6 7 8 9 10 11 12 13 14 15 16 17 18 19 20 21 22 23 24 25 26 27 28 29 30 31 32 33 34 35 36 37 38 39 40 41 | <?php require 'vendor/autoload.php'; $smarty = new Smarty(); $smarty->setTemplateDir('templates/'); $smarty->setCompileDir('templates_c/'); $smarty->setCacheDir('cache/'); $smarty->setConfigDir('config/'); //$smarty->testInstall(); $smarty->assign('title', 'PHP + Smarty'); $smarty->assign('message', 'Learning a bit about Smarty'); $athletes = [ '0' => [ 'name' => 'Michael Jordan', 'sport' => 'Basquete' ], '1' => [ 'name' => 'Serena Williams', 'sport' => 'Tênis' ], '2' => [ 'name' => 'Tiger Woods', 'sport' => 'Golfe' ], ]; $smarty->assign('athletes', $athletes); //Create an object$user = new stdClass;$user->name = 'Administrator';$user->profile = 'admin'; $smarty->assign('user', $user); $smarty->display('index.tpl'); |
To access the object attributes in the “index.tpl” file is similar to php (->)
1 2 3 4 5 6 7 8 9 10 11 12 13 14 15 16 17 18 | <!DOCTYPE html> <html lang="en"> <head> <meta charset="UTF-8"> <title>{$title}</title> </head> <body> <h1>{$title}</h1> <h2>{$message}</h2> <h3>Athletes list</h3> <ul> {foreach $athletes as $athlete} <li>{$athlete.name} - {$athlete.sport}</li> {/foreach} </ul> <p>User: {$user->name}</p></body> </html> |
Fourth example: accessing $_GET, $_POST, $_SESSION
The reserved variable {$smarty} allows access to information that was submitted through a request. Below are some examples of its use
<!-- URL: http://localhost:8080/?page=contact --> {$smarty.get.page} <!-- "name" and "email" fields of a form submitted via POST --> {$smarty.post.name} {$smarty.post.email} <!-- Access "isLogged" session --> {$smarty.session.isLogged} |
Smarty also allows us to assign a default value to any variable. This way, if the variable is not “set”, the “default” value will be displayed.
<p>{$loggedUser|default:"Guest"}</p> |
Fifth example: conditional structure (if/else)
Although it is recommended that business rules are in the logical layer, sometimes the need to use conditional structures within a template file will inevitably arise.
Its use is simple, through {if} and {/if}
{if $user->profile == "admin"}
   <p><a href="#">Manage users</a></p>
{/if} |
If necessary, we can also use {else}
{if $user->profile == "admin"}
   <p><a href="#">Manage users</a></p>
{else}
   <p><a href="#">My Profile</a></p>
{/if} |
Anyway. See that the use of Smarty syntax is very simple and intuitive and the use of this library can help a lot in the development of our projects in terms of separation of logic and presentation and also in the production of cleaner code.
I hope you enjoyed this content.
See you!
Rafael Wendel Pinheiro
Holds a university degree in Information Systems, a postgraduate degree in Database Systems and a master's degree in Education with a focus on Sociocommunity Technologies. He works as a professor of technical and technological education at the Federal Institute of Education, Science and Technology of São Paulo, teaching subjects in the areas of programming, database, project development and software engineering.
Excellent and brief introduction. Thanks a lot!
Config examples?